Lamb Fettah Lamb Fettah : Beautifully tender, succulent chunks of meat are laid over Egyptian rice which has been cooked in tasty stock. At its base are pieces of crispy bread. These have been soaked in a wonderfully rich gravy which the bread sucks up …
Tomato Sauce; rich and glorious This Tomato Sauce stands out from the crowd with the addition of cumin and lots of lovely garlic. These two important ingredients fill the air with fantastic heady aromas as well as providing full-bodied flavour. Tomato sauce is of major …
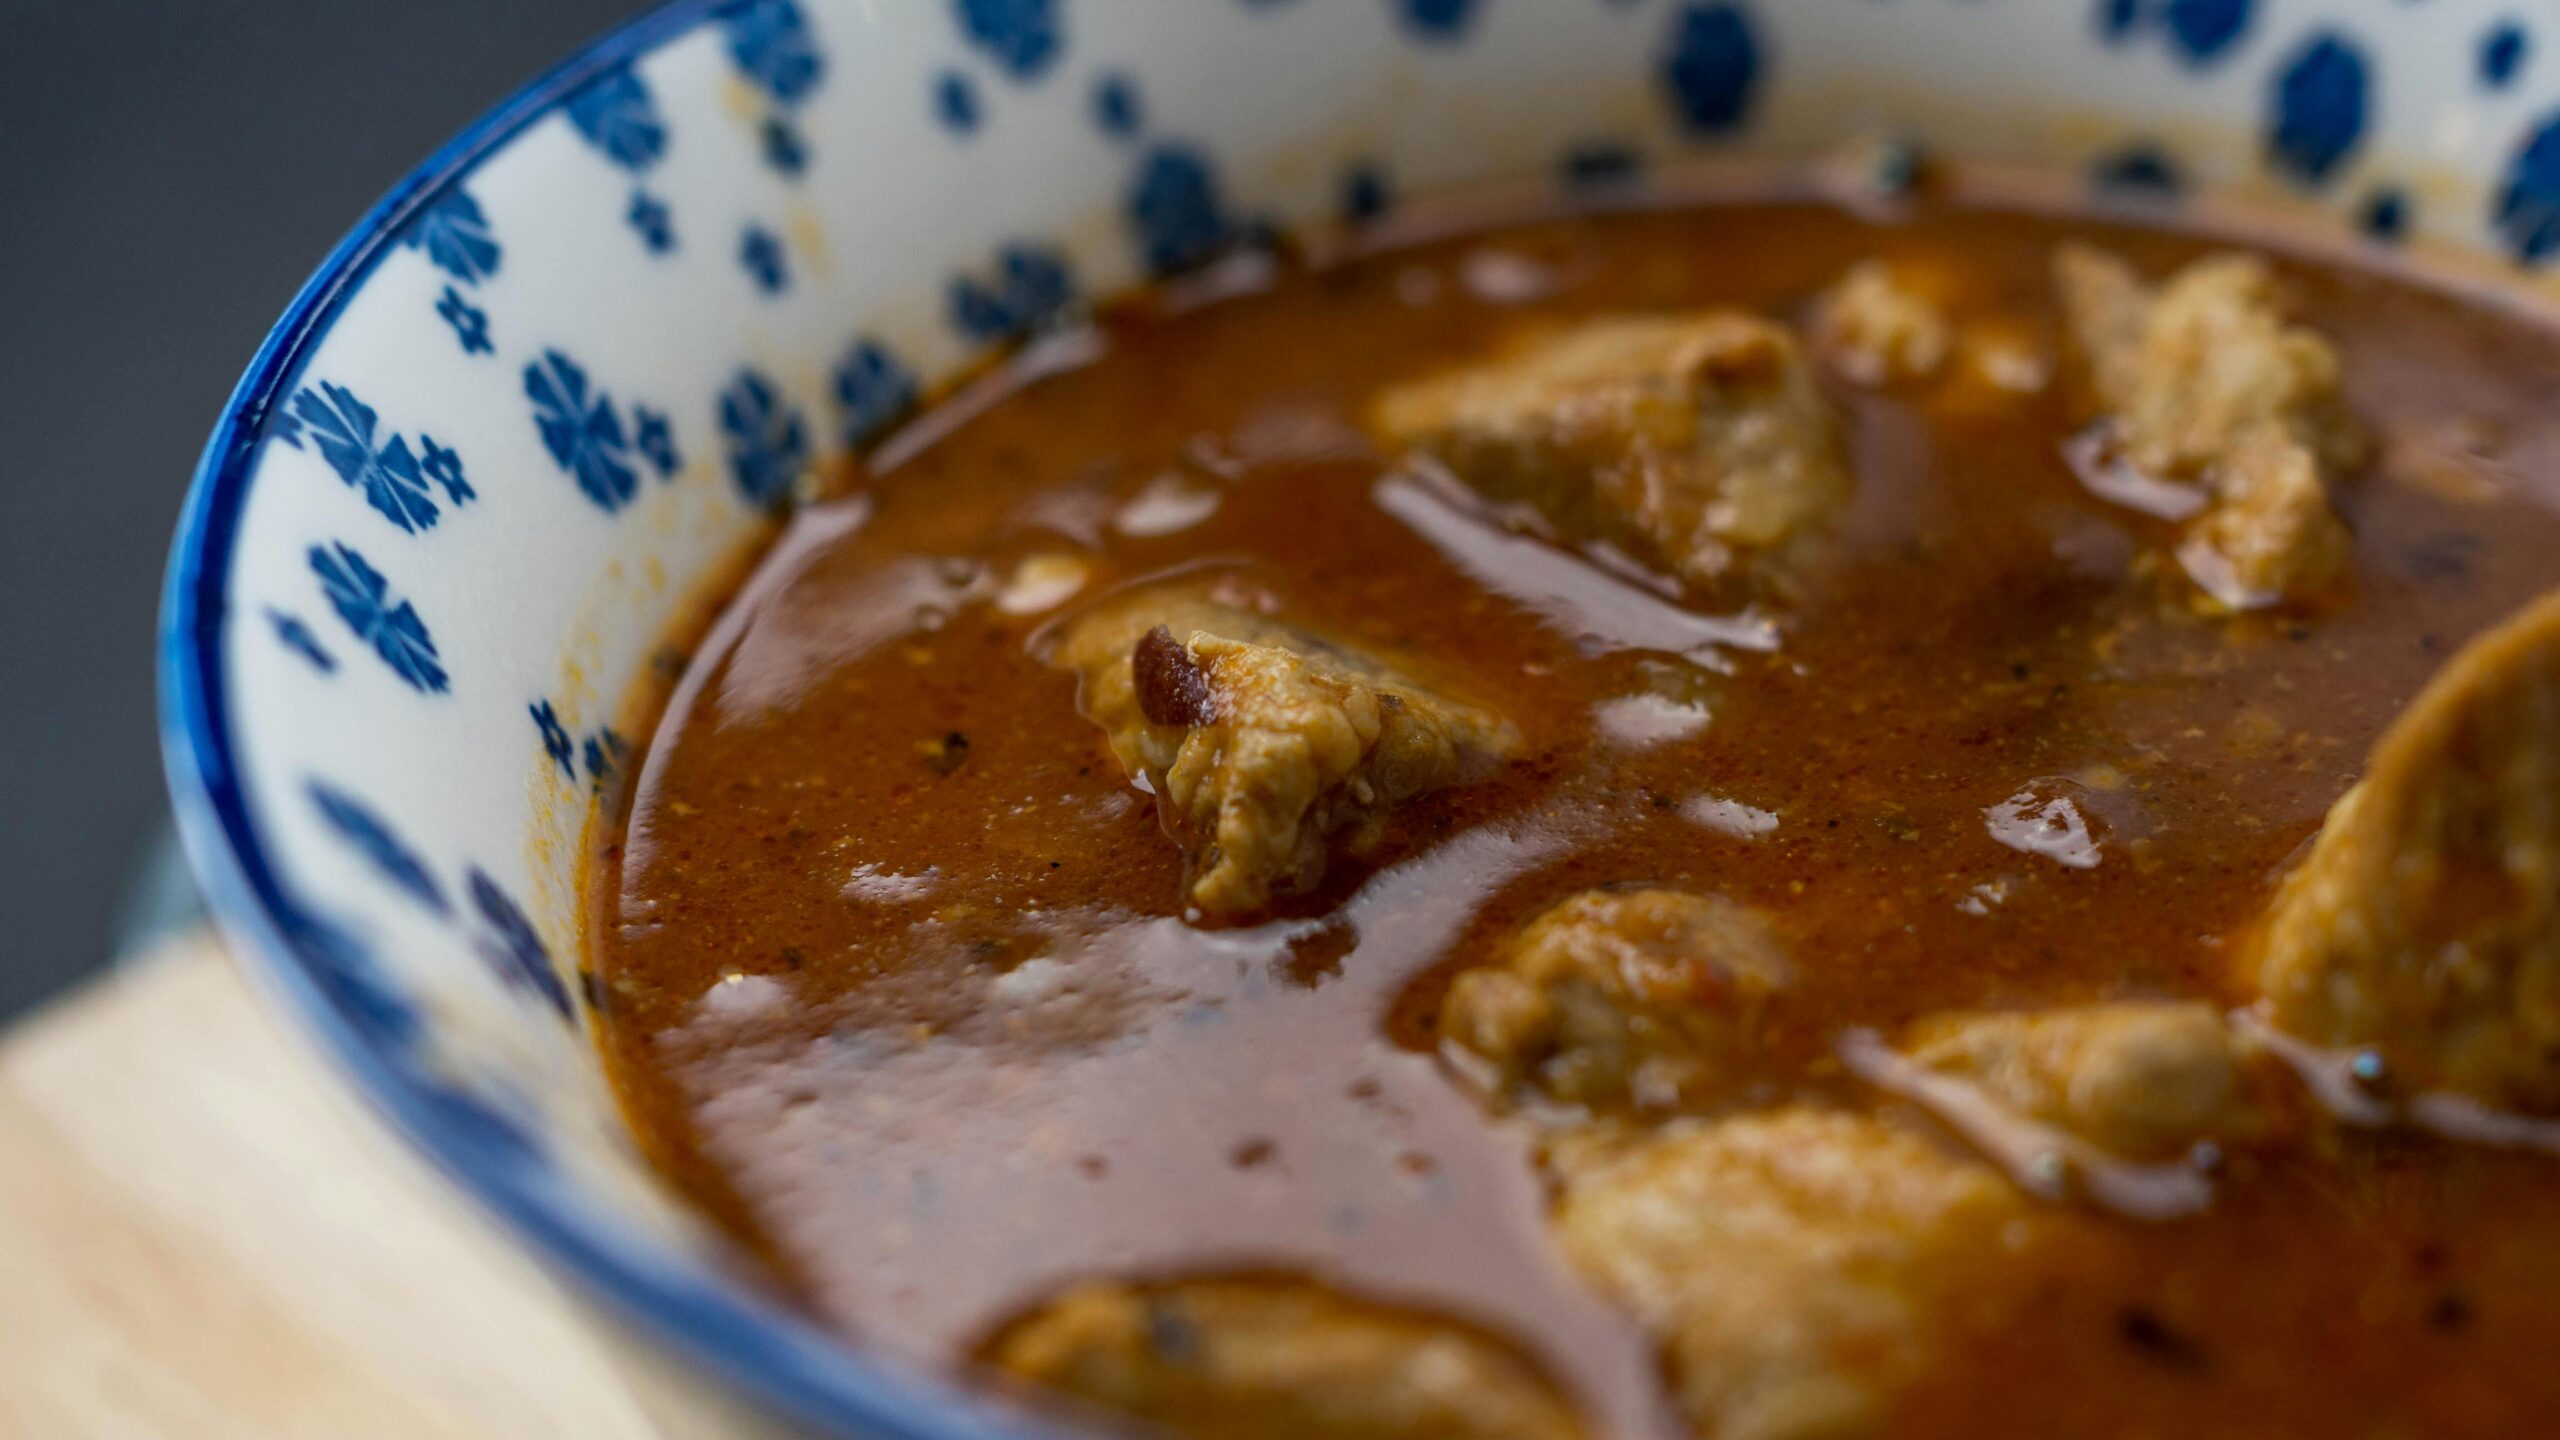
This Spiced Slow-Cooked Lamb is cooked over a low heat for about 3 hours resulting in ultimate tenderisation and flavour.
This recipe is perfect for Lamb Shanks, Half Leg of Lamb ( the thicker end) or boned lamb.
The spices used to season this glorious dish provide a heady aroma and the most wonderful flavours.
Try this recipe, your taste buds will love you for it!
Perfectly tender Spiced Slow-Cooked Lamb
At the end of its cooking time your lamb is so perfectly tender and the flavours are just out of this world.
In Egypt meat is cut into large chunks 2” x 2” x 1”. And each person is just given 2 or 3 pieces of meat. If you prefer your meat cut smaller, as is the norm for English food, that’s fine, the meat will still cook much the same. If you prefer you could alternatively use lamb shanks for this recipe.
This is a great recipe to be cooked in a Slow Cooker.
Serves 4
Ingredients
2 lamb shanks, ½ a leg of lamb (the thicker end), or 1kg lamb
Spice mix
2 tsp ground cumin
½ tsp ground nutmeg
1 tsp ground cinnamon
seeds from 3 cardamom pods freshly ground
2 tsp ground allspice
½ tsp ground ginger
2 tsp freshly ground black pepper
Additional ingredients
vegetable oil for frying
2 onions finely sliced
3 tsp garlic puree
1 tsp grated fresh ginger or 1/2 tsp dried ginger
6 fresh tomatoes – chopped or 2 tins chopped tomatoes
juice and zest of 3 fresh lemons
3 lamb stock cubes
2 large carrots – grated
2 red chillies de-seeded and cut into rings – optional
500ml water
Small bunch of fresh coriander – leaves and stalks separated and chopped
Method
Blend all the spices from the spice mix together in a small bowl.
Coat the meat in that wonderful spice blend
Rub half of the spice mix on to the lamb – allow the flavours to infuse for 1 hour if you can
Put a large pan over a high flame to heat up.
Add 2 tbsp oil and when that heats up.
Sear the Meat
The lamb needs to be seared (browned and sealed) all over. So, first make sure the pan is almost smoking hot, then place the lamb in and leave it in one place (without stirring it) for a couple of minutes before turning it.
*Tip if the meat is seared it will turn easily, if it’s not quite ready it will appear to be stuck to the bottom of the pan, in which case leave it for a minute or so before trying to turn it again.
If you have chosen to cook lamb pieces, work in batches and place about 6 pieces of the lamb into the hot oil at a time. When the lamb is browned put those pieces to one side and repeat the process until all the meat is browned. Add a little more oil if necessary.
When the lamb is browned all over put it to one side.
Now for the additional ingredients
Reduce the heat under the pan then add the onions and gently fry them until they become soft and golden.
Add the rest of the spice mix and the garlic and continue cooking for another minute until the oils in the spices are released and the garlic becomes fragrant.
Now add the chopped tomatoes, juice and zest of the lemons, the stock cubes, grated carrot, chilli and the chopped coriander stalks.
Return the lamb to the pan along with the bone. Add enough hot water to cover the meat.
Increase the heat for the pan and bring it to the boil.
Simmer on as low a heat as possible
Then reduce the heat to as low as it will go and allow the lamb to simmer for about 2 – 3 hours, checking occasionally that there is enough liquid in the pan and that it hasn’t dried out.
Stir the pan about every hour. Check your seasoning at the same time – the spices develop as they simmer. Adjust as necessary.
When it’s ready the meat on the lamb shanks and the 1/2 leg of lamb should be so tender that it literally can fall off the bone. The lamb pieces will be ready when the meat is tender and can be cut easily with a spoon.
Allow the meat to cook slightly before serving – the flavours are much richer when it’s not piping hot.
Add the chopped coriander leaves just a few minutes before serving.
Additional Recipes that use Spiced Slow-Cooked Lamb
This recipe is perfect to use for Lamb Fettah, a favourite in Egypt for Eid.
Spiced Slow-Cooked Braised Lamb is perfect for Lamb Fettah
It’s also great to have over Potato Layer Bake or with Egyptian Rice with Shariya. In fact there are so many possibilities. Which ever way you choose to have delicious Spiced Slow-Cooked Lamb, I’m sure you’ll love it.
To get some of the recipes I’ve mentioned click the links below.
As Spiced Slow-Cooked Lamb has such a long cooking time, I frequently cook three or even four times the quantities (in a very large pot) of braised lamb and divide it up and freeze the portions.
When you’re busy it’s excellent to have as back up. Just take it out of the freezer in the morning and it’s ready to heat up in the evening. Cook up a pot of rice and you’re ready to go.
So many times I’ve been grateful for this time saver.
You’ll also save on fuel bills!
I do hope you give this recipe a go I’m sure you’ll love it.
Egyptian cuisine, is famous for its rich and diverse ingredients. It’s a fusion of Middle Eastern, Mediterranean and African food.
To a great extent Egyptian food is plant based. It relies heavily on vegetables, incorporating plenty of beans and pulses into many of the dishes. Meat and fish are served more as a special treat.
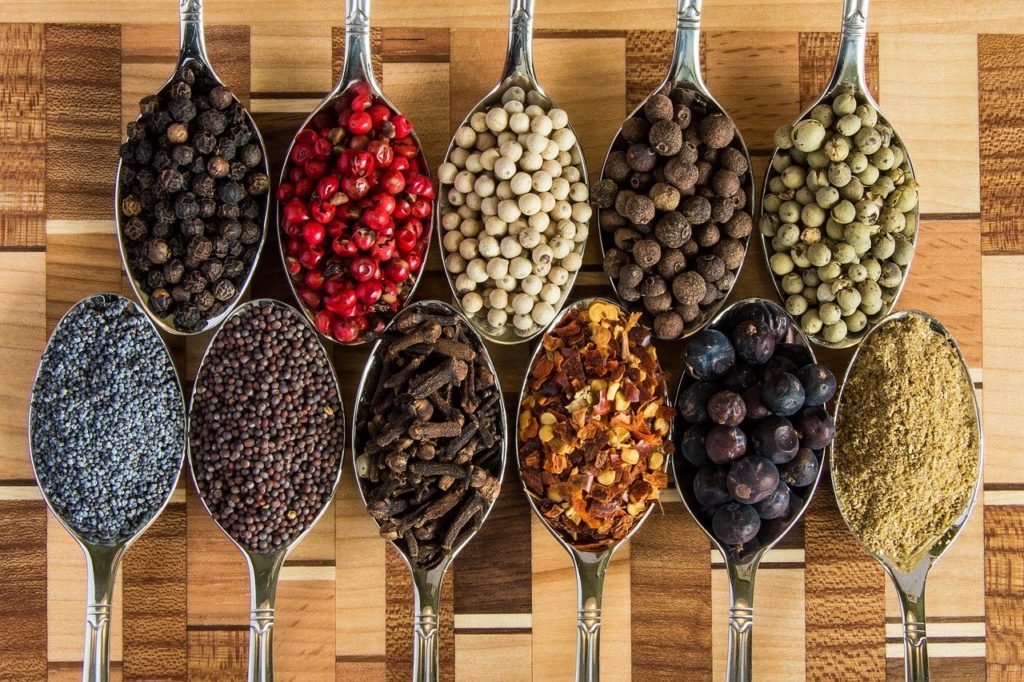
Unbelievable flavours as a result of the Blended Spices and Herbs
Spices and herbs are carefully blended to infuse unbelievable flavours and aromas into the food.
The majority of Egyptians are Flexitarians
I guess you could say, the majority of Egyptians are true Flexitarians and have been for many years, long before it became a popular trend.
Meat is incredibly expensive in Egypt and the majority of the population wouldn’t eat it on a regular basis. When I say expensive we are talking about a kilo of meat costing the equivalent of 2 days wages for an unskilled man.
“Not surprising they’re flexitarians!” I can hear you saying. In its place, pulses and beans are used extensively and creatively as a source of protein.
Egyptian cuisine is great for our vegetarian and vegan friends
As a result, Egypt is a great place for vegetarians; there’s just so much choice, food wise.
Many different influences resulted in the food we now regard as Egyptian
Egypt has taken the best of a number of different cuisines and adopted them into the food now regarded as Egyptian.
“The Silk Road” brought exotic spices.
Egypt’s geographic positioning meant that traders travelling from the Far East along the “Silk Road” to the Maghrebs (North West Africa), centuries ago, passed through Egypt. They were selling not only their silks and fine fabrics but also their wonderful spices. And to this day these spices are still a very important component of Egyptian cooking, creating exotic rich flavours. At the same time these traders introduced new and exciting ways of preparing food and these were also adopted.
The Ottoman Empire introduced wonderful rich flavours to Egyptian cuisine
Another great influence on Egyptian cuisine was the Turkish occupation. The Turks, under the Ottoman Empire, ruled Egypt for over 300 years until the early 1800s. The Ottomans were renowned for their cuisine and their stringent table manners. Their influence enriched Egyptian food and its culture as is evident and many similarities can be drawn.
Ladies skillfully blend fragrant spices to create luscious, rich flavours
In Egypt, ladies do virtually all the cooking in the home. They have a reverence for the art of cooking, preparing everything from scratch, using fresh ingredients. They take great pride in their cooking skills and they have the ability to take quite basic ingredients and elevate them to unrecognisable levels.
These wonderful cooks skilfully blend fragrant spices, and with the addition of fresh herbs, they produce fantastic cuisine with exotic rich flavours. These skills are something you’ll learn here at “Secrets of a Cairo Kitchen”.
So if you’re looking to ignite your cooking skills and elevate to the next level, stick around and find out more.
We bring you “Real Egyptian Cuisine”
The Egyptian food “Secrets of a Cairo Kitchen” brings to you is “Real Egyptian Cuisine”.
By “Real Egyptian cuisine” I mean the food cooked by Egyptians, in their homes, as opposed to food which is served in restaurants and hotels in Egypt which has been adapted to be more “western”, for the tourists.
“Secrets of a Cairo Kitchen” aims to bring you the best recipes for the food Egyptians actually eat.
Are you ready to ignite your cooking skills?
So, if you’re looking to ignite your cooking skills, elevate to the next level, and discover some incredible new dishes, check out the recipes here at “Secrets of a Cairo Kitchen”.
Kosheri, considered by many to be the national dish of Egypt.
This national treasure is a delicious, cheap and filling dish of rice, macaroni and brown lentils topped with a rich tomato sauce, enhanced with chickpeas and crispy fried onions. It was brought to Egypt during the era of British colonisation in the late 1800s, adapted from a dish they ate in India during the British Raj.
Molukheya, the iconic Egyptian soup; gloriously rich, dark green in colour, highly nutritious and laced with garlic. This soup was so prized during the times of the pharoahs that no commoners were allowed to eat it , only Royalty had that honour.
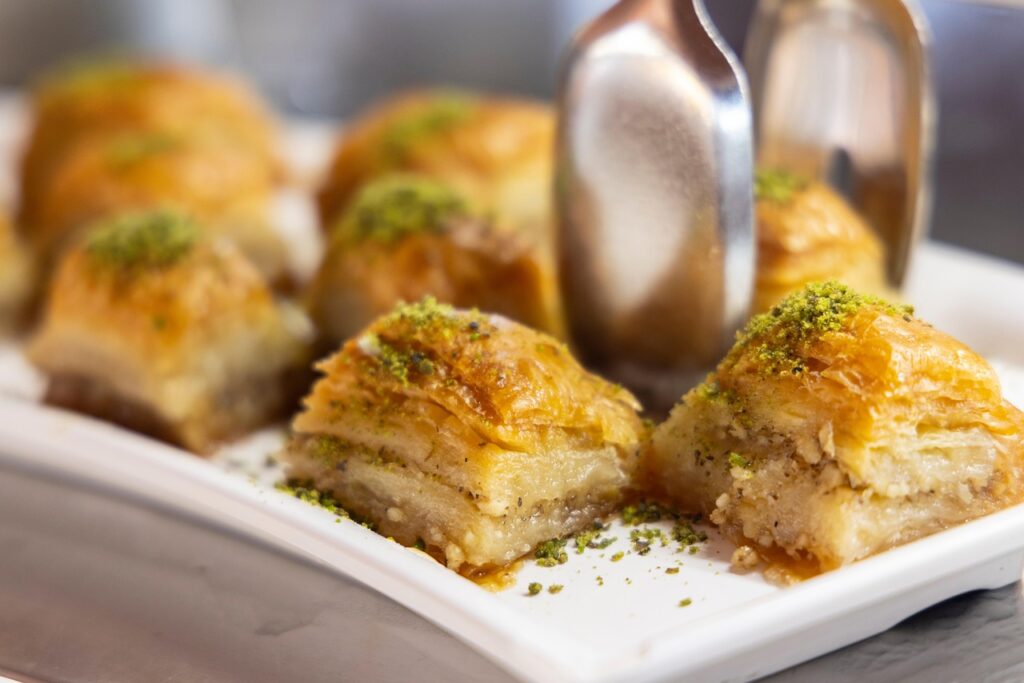
baklava, pastry, dessert, bathed in fragrant syrup
Baklava, a delicious pastry dessert made up of layers of crispy filo dough, chopped nuts, and fragrant syrup. It was introduced to Egypt during the Ottoman Era.
These are incredibly popular pastries and surprisingly easy to make.
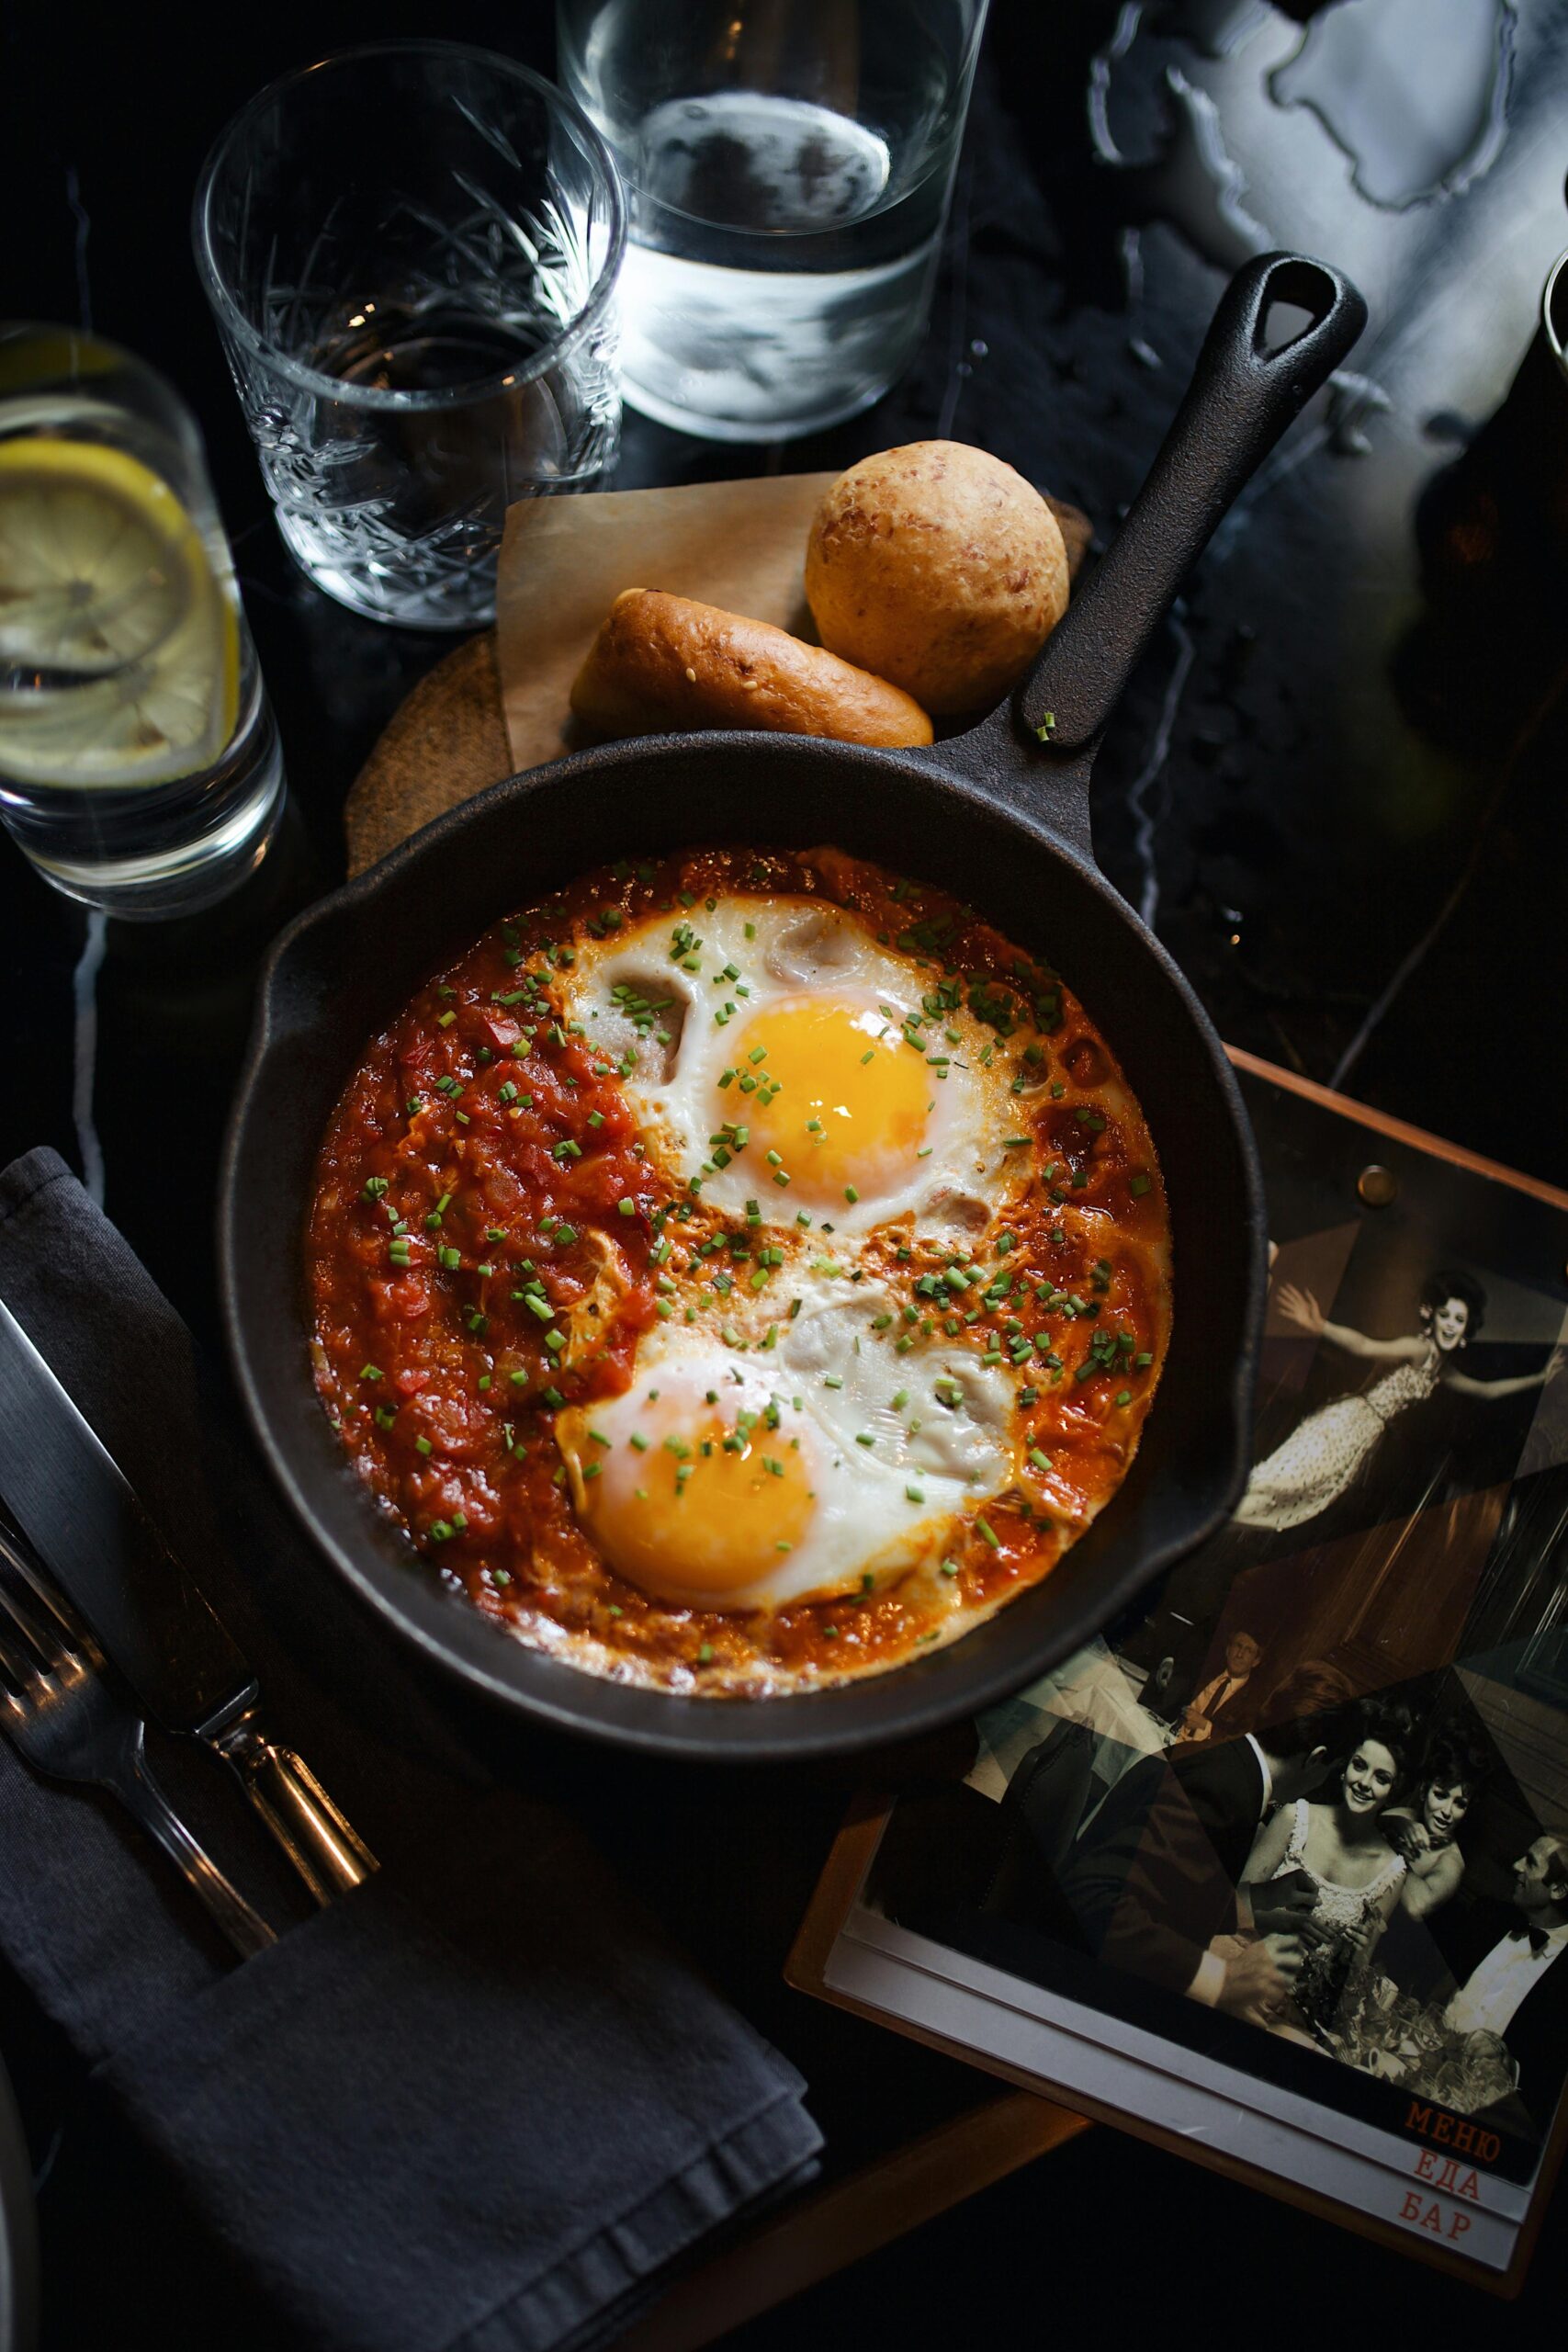
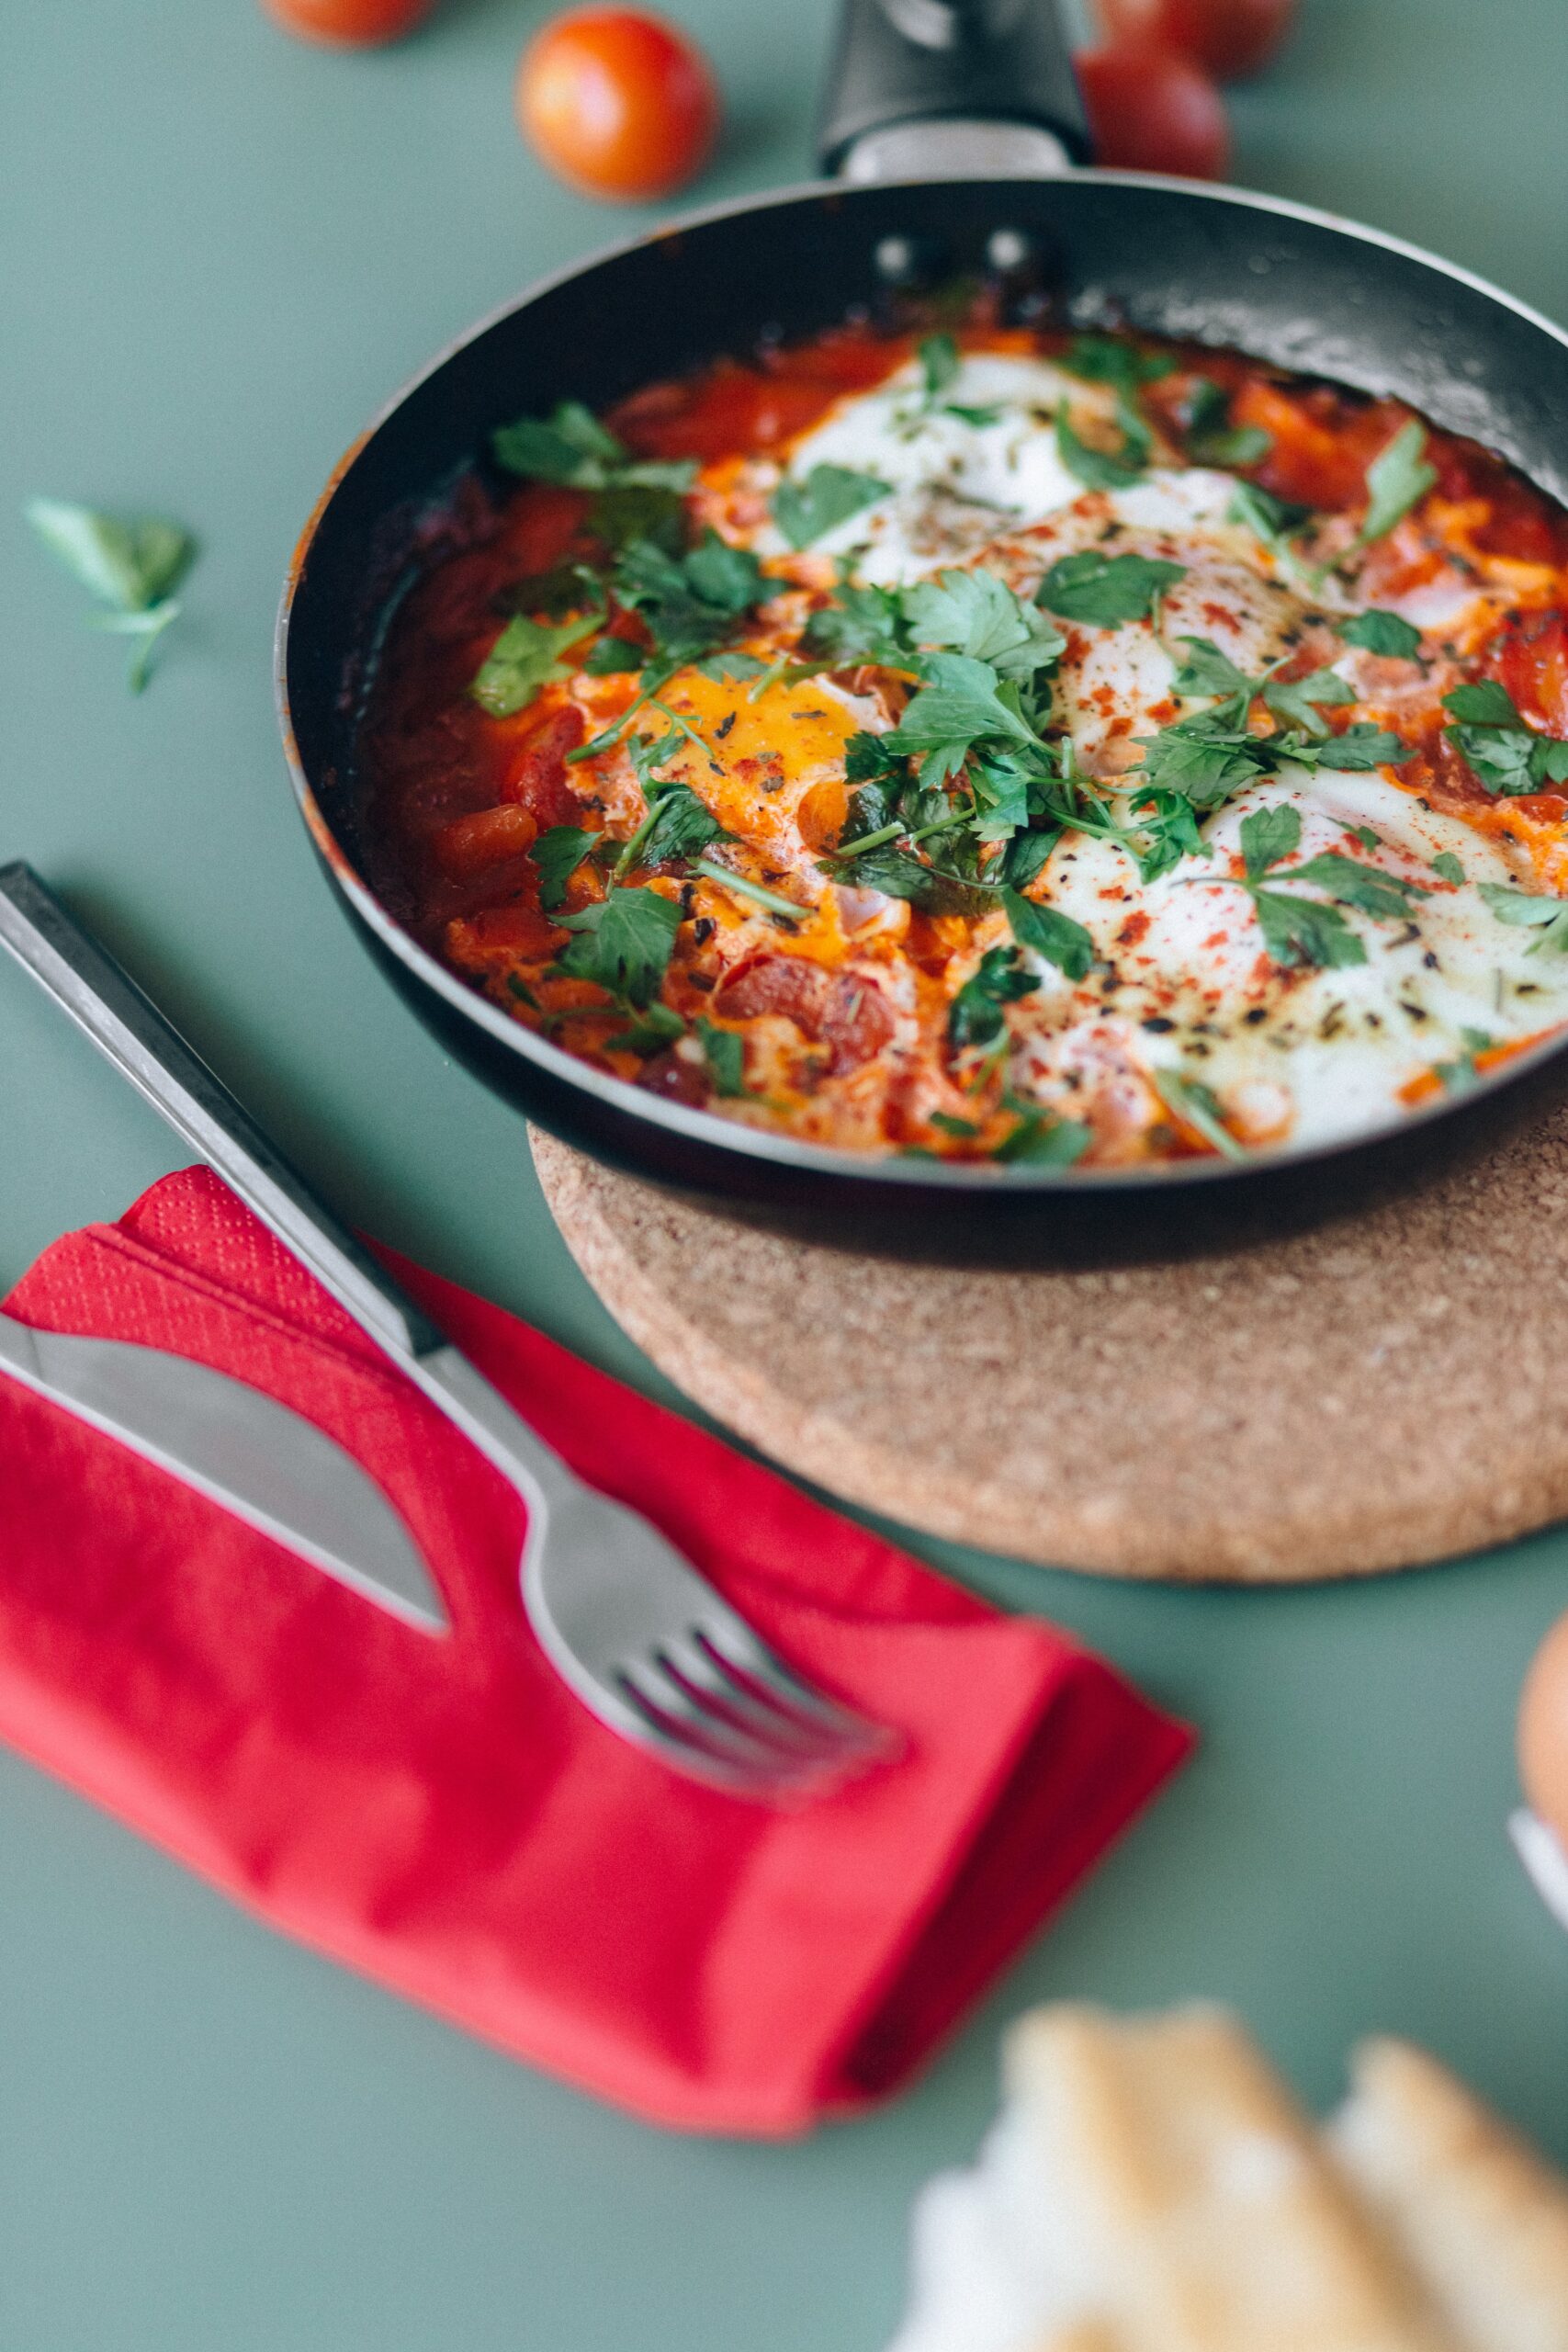
Shakshuka – a full flavoured breakfast or supper dish of eggs poached in a wonderfully rich & spicy tomato & bell pepper sauce, thought to have originated in Maghrebi (Morocco / Tunisia) and introduced to Egypt by traders travelling the Silk Road.
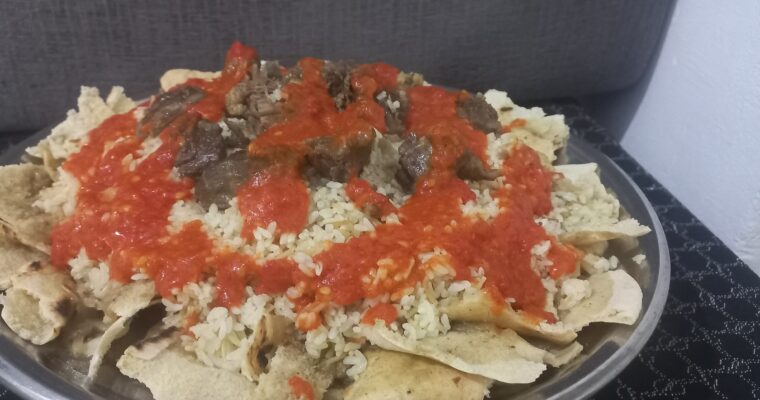
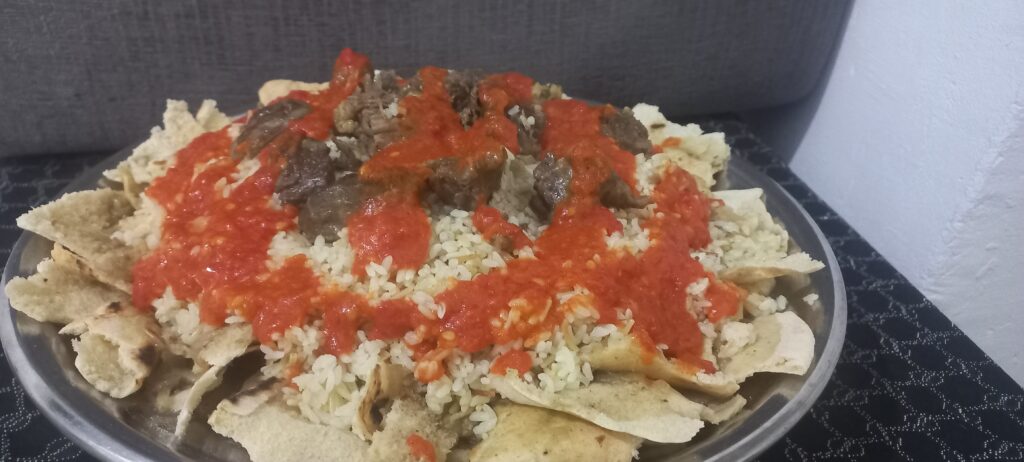
Lamb Fattah – the quintessential Egyptian festive meal.
Layers of seasoned, toasted pita bread are soaked in rich stock and covered with fragrant rice. This is topped with a glorious lamb stew and drizzled with a full- flavoured tomato and garlic sauce.
Bursting with bold flavours and textures. It’s a real crowd pleaser.
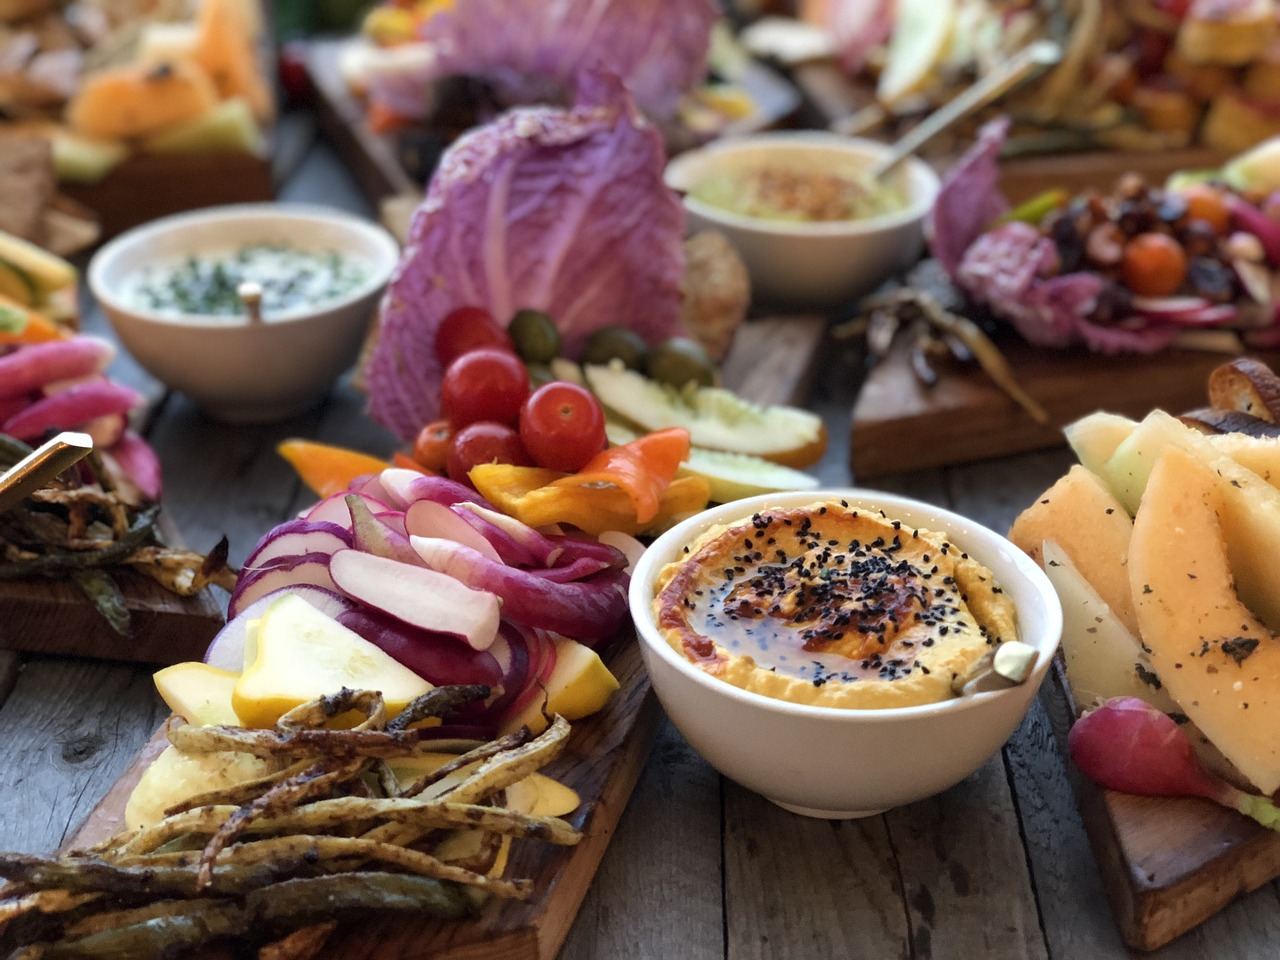
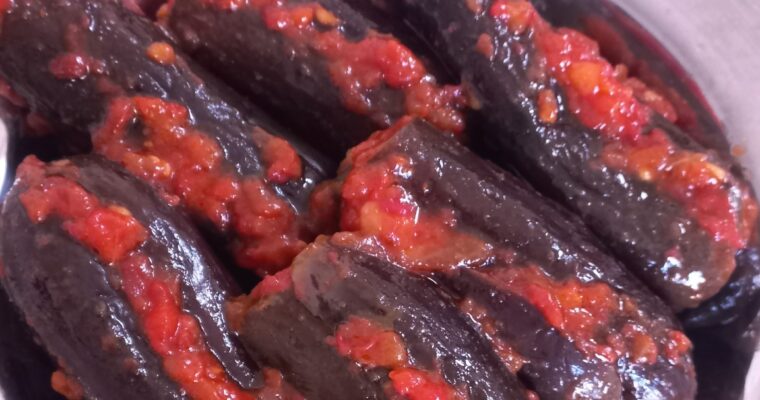
Pickled aubergine have a rich tomatoey stuffing that’s packed with flavour and has a good fiery kick from the chilli. They’re brilliant as part of a mezze or as a side dish with any meal.
Koshary – the rice and pasta dish with a delicious tomato sauce
Koshary is a wonderful dish. It’s one of Egypt’s most popular street foods; a good, filling meal which tastes delicious. And you can prepare it at very little expense with ingredients you probably already have in your store cupboard.
Koshary combines rice, macaroni and lentils, which is then topped with a gloriously rich tomato sauce, laced with garlic and cumin. The resulting dish is not only a substantial meal but more importantly it tastes fantastic and it’s a guaranteed crowd pleaser.
If Koshary is on the menu, then this is the recipe you want to use. Every time it’s made, it gets rave reviews.
It’s a brilliant option for our Vegetarian friends
Everyone loves Koshery and it’s a brilliant option for Vegetarians and with minor adaptations it’s also great for Vegans.
Koshary is one of the most popular street foods in Egypt
Yes, Koshary is most definitely a signature dish of Egypt. You see Koshary shops all over Cairo (and of course the rest of Egypt) with their mountains of rice and macaroni. The wonderful smell of the delicious tomato sauce with its garlic and cumin filling the air. The glorious smell tempts the crowds who then queue outside waiting for their turn to enjoy this savoury delight.
The origins of Koshary
Was it British occupation?
There are several stories about the origins of Koshary. One is that it was introduced during British occupation in Egypt. Having previously spent time in India during the British Raj they had become accustomed to eating Kedgeree with rice, onions, smoked fish, spices and wonderful flavours and when they came to Egypt, they looked to develop something similar and Koshary was created.
The Italian influence ?
Another story tells of how it was Italian influences from just across the Mediterranean that brought about its creation.
Or was it a creative chef with a near empty pantry ?
The last story is much more of a ‘Ready, Steady Cook’ scenario, where it was invented by a chef who was in a situation where there was very little of anything left in the pantry; well not enough of any one thing to prepare a meal. So instead, a meal was prepared bringing together lots of odds and ends to concoct a new dish which was apparently so popular that it went on to become one of the most popular street foods in Egypt today.
It’s all about layering it up
There are several components to this dish, so it’s good if you’re good at multi-tasking. Having said that everything is incredibly easy to make.
There is a traditional format to plate this up. First on the plate you have a layer of Egyptian rice. On top of this is a layer of macaroni. This then has lentils scattered over it, followed by the rich, tasty tomato sauce. The chickpeas are spread around the edge of the plate and the delicious, dark brown crispy onions then crown this masterpiece. The garlic and lemon sauce is served in a bowl with a spoon for people to drizzle over the top.
When I cook Koshary for a large crowd, I’m afraid tradition goes out of the window
On the many occasions that I have cooked this for large groups of people (i.e., more than a dozen at a time) I broke with convention, and I found it easier to mix the rice, macaroni, and lentils together. It was then possible to serve this onto plates from just one pan rather than from 3 separate pans.
I also heated the chickpeas in the tomato sauce which I think made them even more tasty and as a result I do it this way every time now.
The crispy onions, and garlic and lemon sauce were then served in separate bowls, for people to help themselves.
If you’re cooking for a crowd you could always cook the tomato sauce the day before, or even the week before and put it in the freezer and take it out the night before to defrost. That could take a bit of pressure off on the day.
So, how long does it take to make everything for Koshary?
The tomato sauce takes about 45 minutes in total to cook.
Of course all these components are cooked up simultaneously so the whole dish can be cooked in under an hour.
To serve 6 people
Ingredients
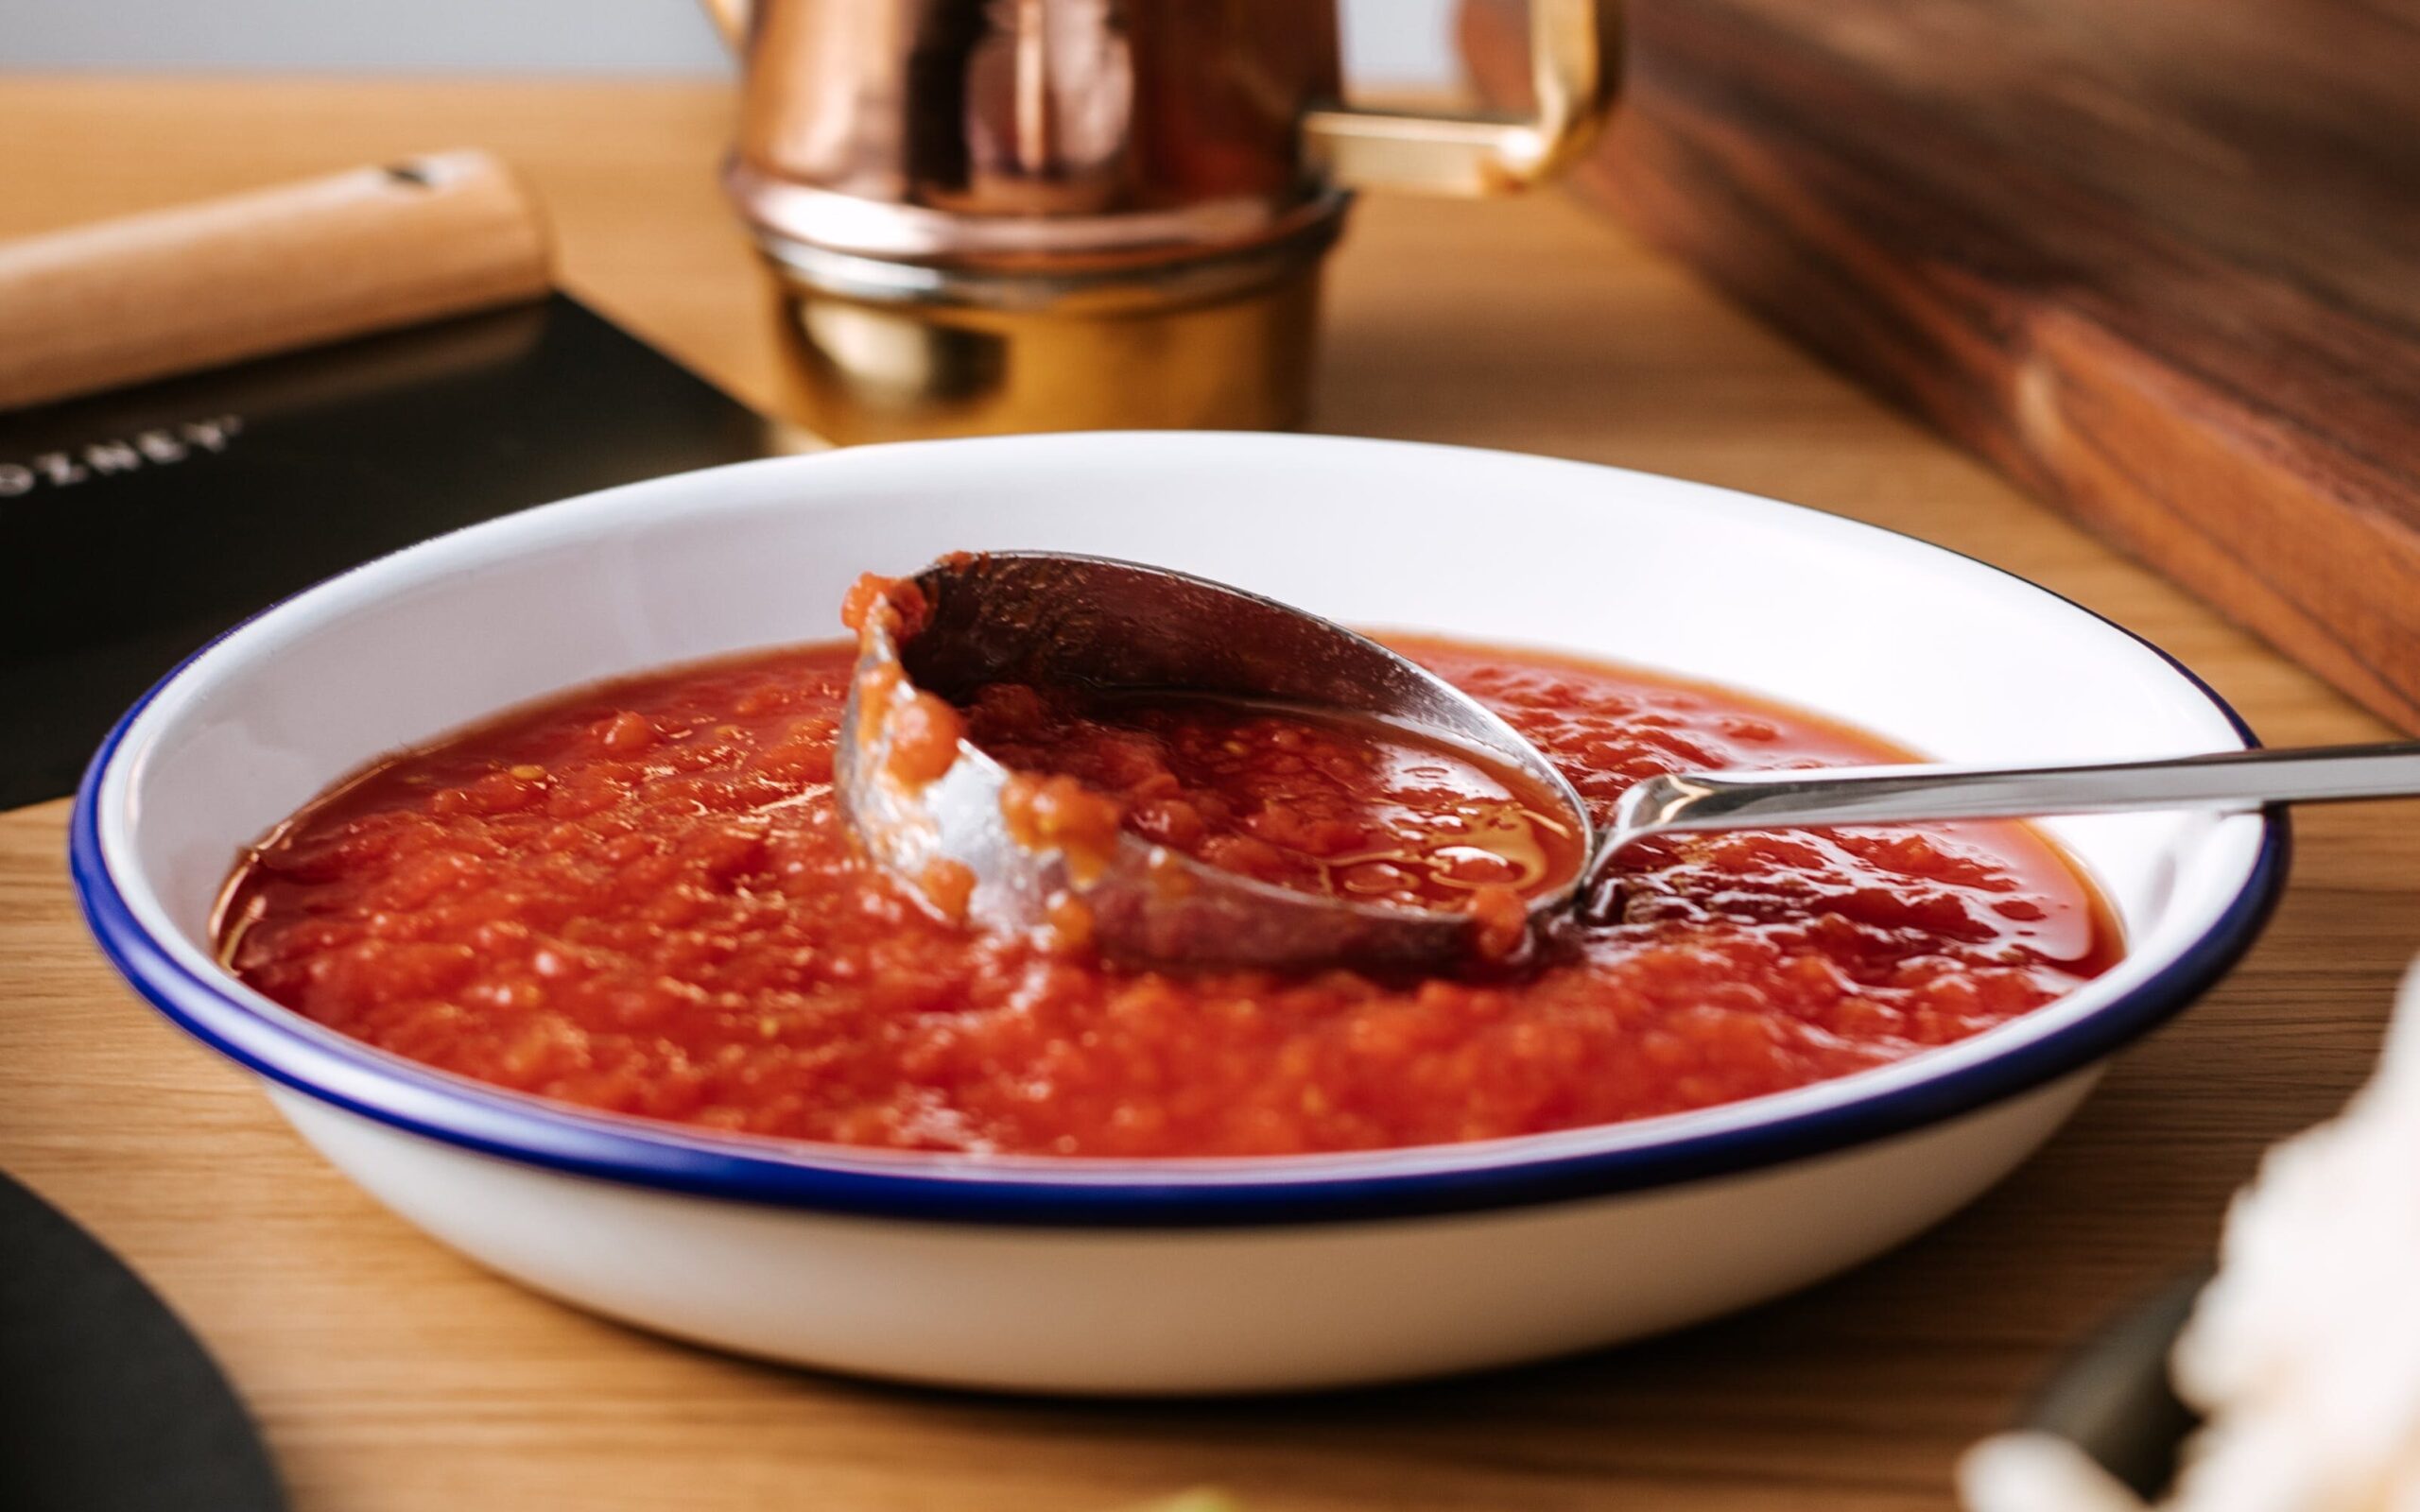
Ingredients for Tomato Sauce for Koshary
Vegetable oil for frying
2 large onions finely chopped
5 cloves garlic grated or 3 heaped tsp garlic puree
3 tins of chopped tomatoes or 8 large ripe tomatoes – finely chopped
2 stock cubes grated or crumbled
½ pt water
2 tbsp ground cumin
the leaves of a small bunch of fresh coriander – finely chopped (optional)
freshly ground black pepper
a pinch of chilli flakes (optional)
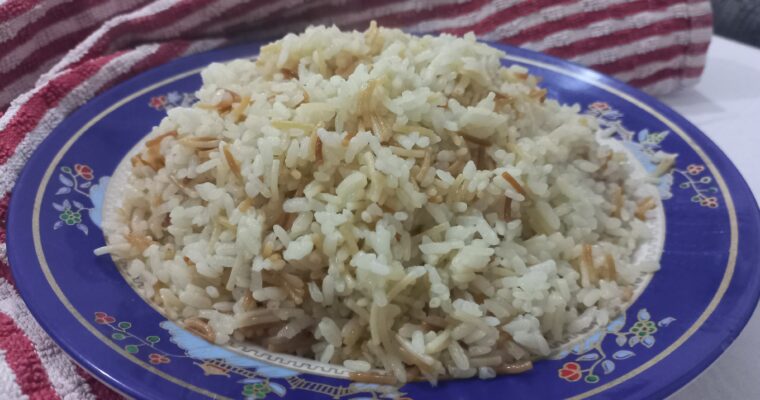
Ingredients for Egyptian Rice for Koshary
Oil for frying
2 mugs Egyptian short grain rice or normal long grain rice
3 mugs stock – heated to near boiling temperature
2 tbsp ghee (clarified butter) (optional)
Ingredients for Macaroni for Koshary
600g macaroni
a little cooking oil
750ml stock made from 3 stock cubes dissolved in 3 mugs of boiling water
Ingredients for Brown Lentils for Koshary
1/2 cup brown Lentils
Ingredients for Garlic & Lemon Sauce
6 tbsp Ghee or you could use butter
4 tbsp garlic puree
juice of 3 lemon
salt and freshly ground pepper
Additional Ingredients
1 can chickpeas
2 onions finely sliced – for frying crispy onions for your topping
Method
Method to cook your Tomato sauce
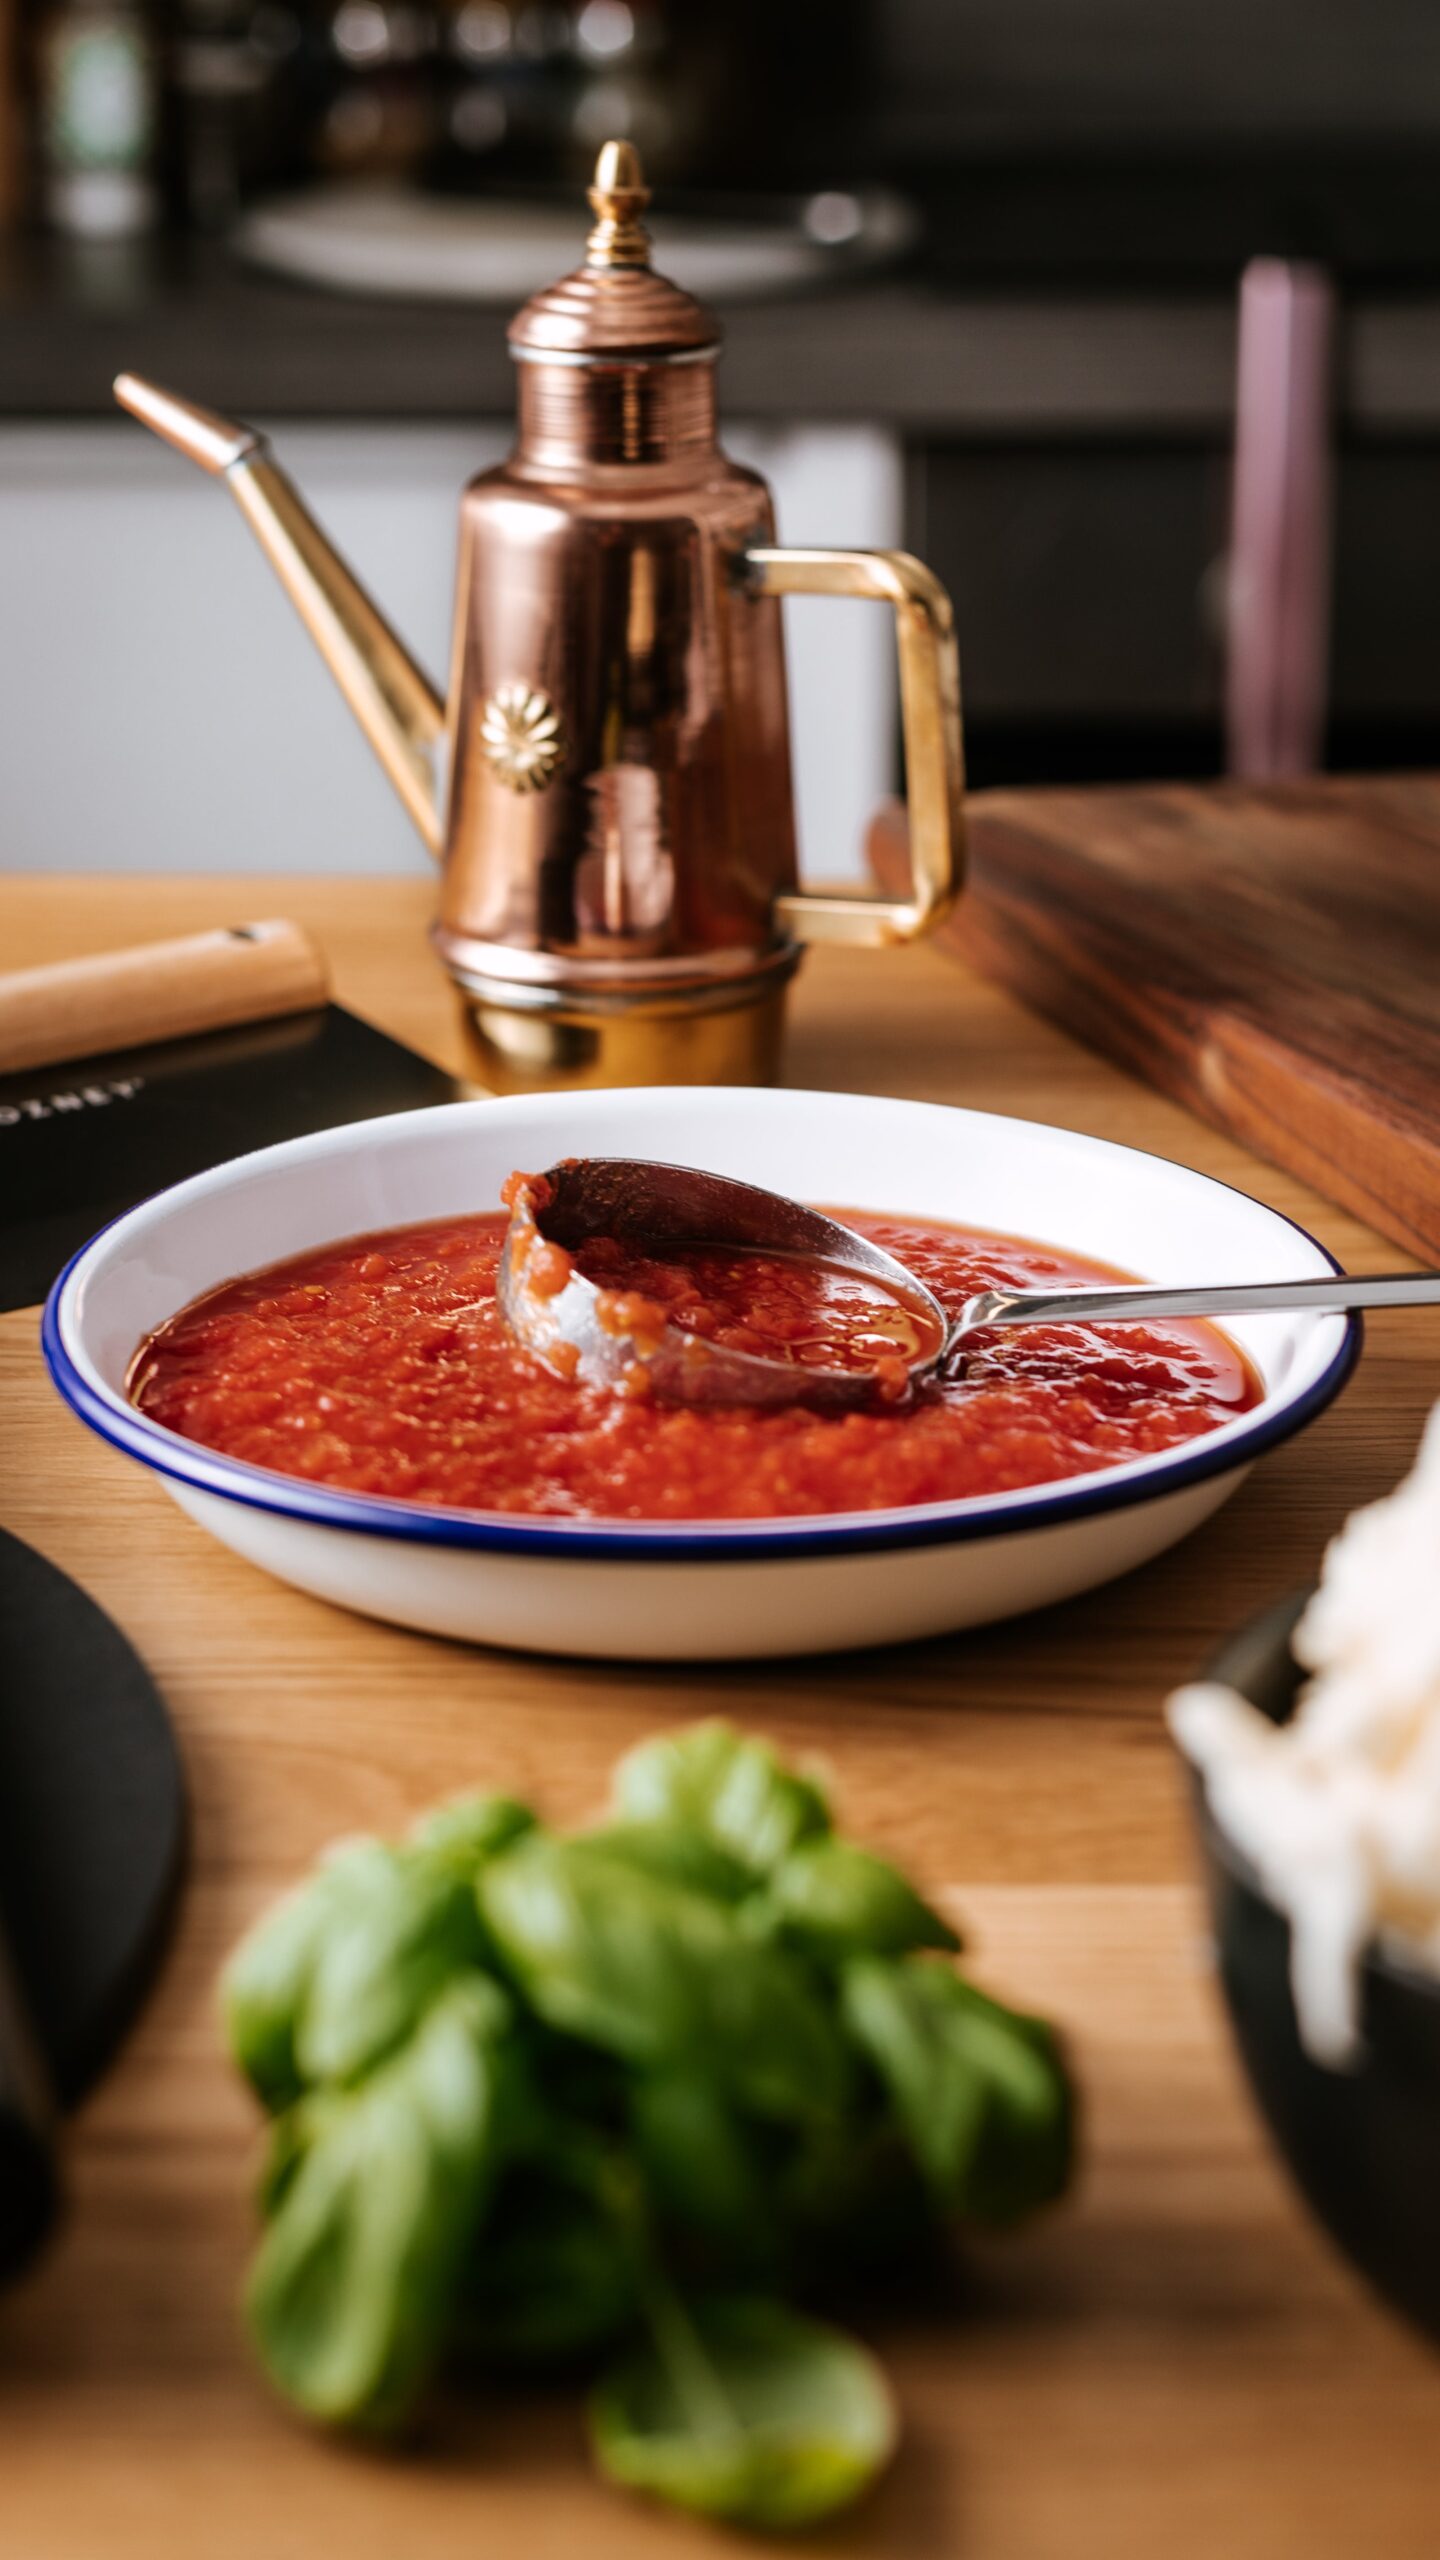
Deliciously rich Tomato Sauce, perfect for Koshary
Blitz your tomatoes
If you’re using using fresh tomatoes, put them into a blender and blitz them for a few seconds until they are completely blended. Alternatively you could grate them.
Fry up your onions for your tomato sauce
Pour enough oil into a large frying pan to cover the bottom.
Put this over a medium heat and add the onions. Fry them until they begin to take on a golden-brown colour and soften.
Add the garlic and cook for just 1 minute.
Add your tomatoes
Then add the blitzed tomatoes to the onions and continue cooking the sauce until it goes from being a pinkish red colour and takes on a much richer red colour and begins to thicken.
Add the stock cubes, water, cumin and chilli flakes (if you are using them).
Turn down the heat & simmer for 15 minutes
Reduce the heat down to a gentle simmer.
Season well with the black pepper and continue simmering for a further 20 – 25 minutes, stirring occasionally.
Check your tomato sauce doesn’t dry out add a little extra water if necessary.
By this time your kitchen will be full of such goods aromas
Take the pan off the heat.
Add your herbs just before serving
Add the chopped coriander leaves (if you are using them) just before serving to ensure they don’t lose their colour.
Your delightfully rich tomato sauce is now ready to ladle over your koshery mix, and to be enjoyed by all!
Method to cook the Egyptian Rice
First fry up the rice
Put a good drizzle of oil into a large pan. Put the pan over a high flame to heat up.
When the oil is sizzling add the rice and fry it until it begins to brown – stirring continuously.
Add the stock – CAREFULLY
For the next stage PLEASE BE VERY CAREFUL – I would advise you to wear an oven glove on the hand you are pouring from and keep your face well back – the first lot of liquid you add to the hot rice and oil will shoot hot steam up like a full-blown volcano so be warned. The first time I did it I had the scare of my life.
So now carefully pour the hot stock into the rice. As I said be careful.
Reduce the heat and simmer for 12 minutes
Stir the rice to make sure it doesn’t clump together Add the ghee then reduce the heat down to the lowest heat possible and cook for 12 more minutes.
Let it steam for another 6 minutes
Turn the heat off but keep the lid firmly in place so that the rice can finish off cooking in the steam for a further 6 minutes.
Fluff it up and the rice is ready
Remove the pan from the heat and using a fork fluff up the rice.
Now it’s ready to serve.
Keep the lid on the rice to keep it hot, it will stay hot for over 1/2 hour if you do this.
Method to cook your Macaroni for koshary
Put a little oil into a saucepan and add your macaroni.
Heat the pan over a medium to high flame, stirring constantly until the macaroni begins to toast slightly.
Add the hot stock. Bring to the boil and then reduce the heat to a simmer stirring occasionally.
Simmer for about 12 minutes until the macaroni softens. By this time quite a lot of the stock will have been absorbed. Any remaining liquid will continue to be absorbed so no need to drain.
Once the macaroni is cooked take it off the heat. Cover with a lid and keep warm until everything is ready.
Method to cook your Brown lentils
Rinse the lentils thoroughly then put them in a small pan and boil them in plain unsalted water for about 15 minutes until they begin to soften.
How to cook yourCrispy onions
Heat a deep frying pan (I use a wok) over a high flame.
When its well heated add some vegetable oil and allow that to get really hot before adding the onions. Fry the onions until they become very crispy and browned.
Sprinkle with a little salt once they are cooked.
How to to cook your Chickpeas
Simply open the can, warm the chickpeas in a pan over a medium heat and drain – you can drizzle with olive oil and sprinkle lemon juice and chilli flakes over them if you choose.
Or you could simply drain them and add them to your tomato sauce to heat through – it’s less traditional but in my opinion its quicker, and it creates less pans to wash up.
Plus, I think it adds to the flavour of the chickpeas.
Method to prepare Garlic and Lemon sauce
Using a small pan, start to melt the ghee over only a medium heat.
Don’t fry the garlic, just allow it to bathe in the warm butter to release its gorgeous flavours
Add the garlic to the ghee straight away before it starts to get too hot, that way the garlic will cook slowly and release all its gorgeous flavours without starting to brown or char which can make it bitter.
As the ghee heats through, the wonderful rich aroma of the garlic is released into the air.
Once the butter is melted remove the pan from the heat.
Now it’s time to add the lemon juice. Add it very gradually and beat the butter as you do.
Season well with the salt and freshly ground pepper.
Your garlic and lemon sauce is now ready to serve.
How to serve your delicious Koshary
As I said, start with a layer of rice. Over the rice lay a layer of macaroni. And on top of the macaroni sprinkle the lentils. Follow this with the glorious tomato sauce which will drizzle down and add flavour to everything. Crown your koshery with the chickpeas and wonderfully crispy onions to complete your masterpiece..
Serve the garlic and lemon sauce separately for people to add as they will.
* A couple of years ago, my daughter and her husband visited Khan Al-Khalili, the famous bazaar in Cairo. When it was time to eat they chose Koshary. It was served with a drizzle of chilli oil over it, which they thought just took it to the next level. So you might like to try that as well and see what you think. Let me know.
This is a fantastic recipe to try.
Great if you want to feed a crowd on a tight budget
Yet it’s still packed with flavour.
Let me know how you get on. I love seeing your photos.